How to Create your own favorite Zune movie
- Introduction
- Step 1 :Download and install Apollo Zune Video Converter
- Step 2 :Run Apollo Zune Video Converter and make task list
- Step 3 :Customize output files
- Step 4 :Start conversion
Introduction
Are you a movie fanatic? And an Zune lover? Here is a ginormously
powerful tool to combine these two wonderful things. With Apollo
Zune Video Converter, you can convert your own favorite movie
to Sony Zune. In a few clicks, everything is set for you.
What you need:
- DVD drive and DVD movie disc.
- Microsoft Zune.
Step One: Download and install Apollo Zune Video Converter
Click here to download Apollo
Zune Video Converter. After the download is finished, run exe
file to install.
Step Two: Run the Apollo Zune Video Converter and make task list
Run Apollo Zune Video Converter, and you will
see the main screen appears like this:

Choose profile for out-put files:
Click on the drop-down column to open profile list:
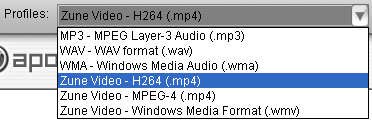
Find the very profile for your Zune, video(mp4,wmv) or audio only(mp3,wma,wav)
Load files and edit your task list
Here' re the buttons control the task list :
![]() To add your conversion task(s); Tip:You can drag-and-drop the files into the list.
To add your conversion task(s); Tip:You can drag-and-drop the files into the list.
![]() To remove selected task(s).
To remove selected task(s).
![]() To clear the task list
To clear the task list
![]() and
and ![]() move a task up or down to decide conversion order.
move a task up or down to decide conversion order.
Step Three: Customize output files
Customizing will be done in "Preview and Settings" window
Click the " ![]() " button at the right side of main window to open/close "Preview and Settings" window:
" button at the right side of main window to open/close "Preview and Settings" window:

Buttons to control the preview window:
![]() : Preview previous task
: Preview previous task
![]() : Play selected task
: Play selected task
![]() : Pause preview
: Pause preview
![]() : Stop preview
: Stop preview
![]() : Preview next task
: Preview next task
![]() : Toggle to full screen preview
: Toggle to full screen preview
Tip:Play the file before any editing
Crop setting:
Click on ![]() to switch to crop setting
to switch to crop setting
Play the video before you want to crop it.
Drag the cropping line or type in to decide the cropping area you want
Tip:you can also drag the whole cropping area to move it to a particular corner.

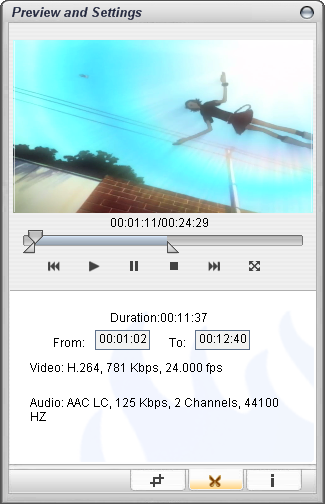
Period conversion:
Click on ![]() to
switch to conversion period settings
to
switch to conversion period settings
Drag the small triangle at both ends or type in to set the length of output video and the start and end point of conversion.
Tip: you can also drag the blue bar to change the start and end point of conversion
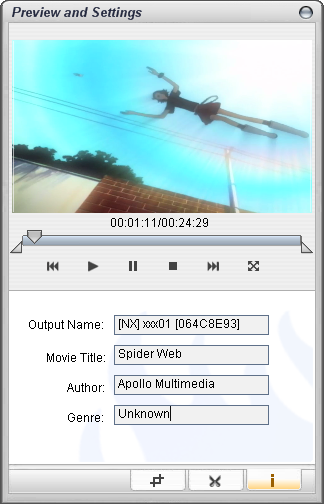
Edit video information:
Click on ![]() to witch to video information editing
to witch to video information editing
Type in the information as you wish
General Settings:
Click on ![]() button on the lower right corner of the main window and select "general settings":
button on the lower right corner of the main window and select "general settings":

Encoder preset: The balance of Speed and Quality of conversion (1:fastest speed;10:best quality).
Deinterlace video when converting: Check this option, when you convert a interlace video.
Shut down computer when job is done: Automatically shut down the computer for you.
[back to top]
Step
Four: Start conversion

When everything is set, click on  start button to begin conversion.